4.4. Segmenting Cells in 3D (advanced)
For this first tutorial, we are going to look step by step into the 3D segmentation of the cells of the embryo of Arabidopsis.
First, download the dataset from BitBucket here: dataset.
4.4.1. Loading the dataset
- Launch LithoGraphX
- Drag & drop the file
160112_4.tifinto the interaction area of LithoGraphX - Adjust the opacity as we have seen in the previous tutorial.
You should see the embryo like in Figure 1.
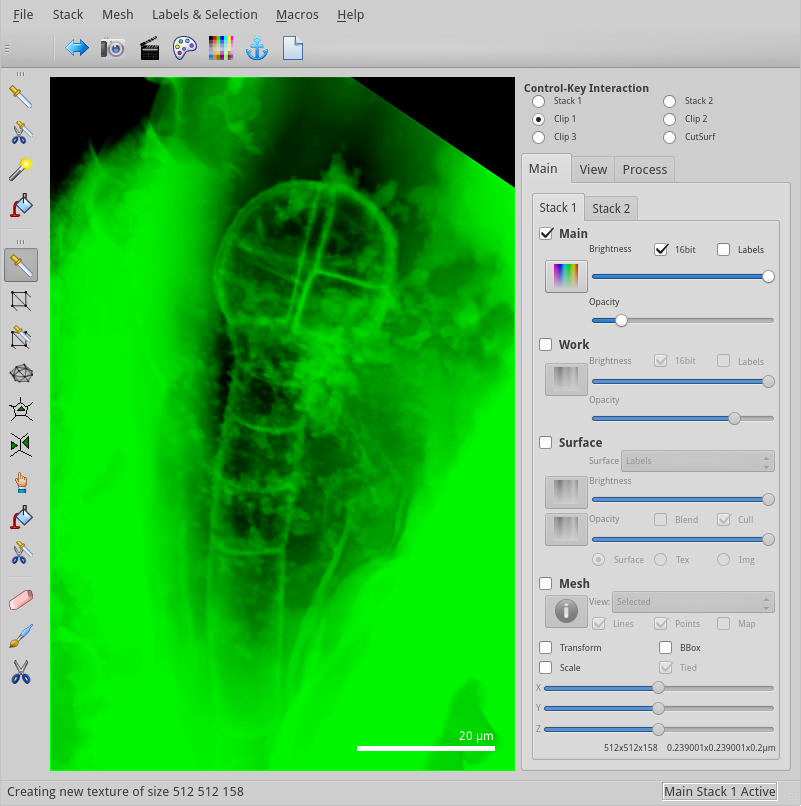
Figure 1: Loaded stack with the embryo
4.4.2. Extracting the embryo
As you can see, in addition to the embryo, we have a lot of extra tissues. There are a number of tools we can use to remove most of it. We will first use the clipping planes and then the pixel editing tool.
4.4.2.1. Trimming with clipping planes
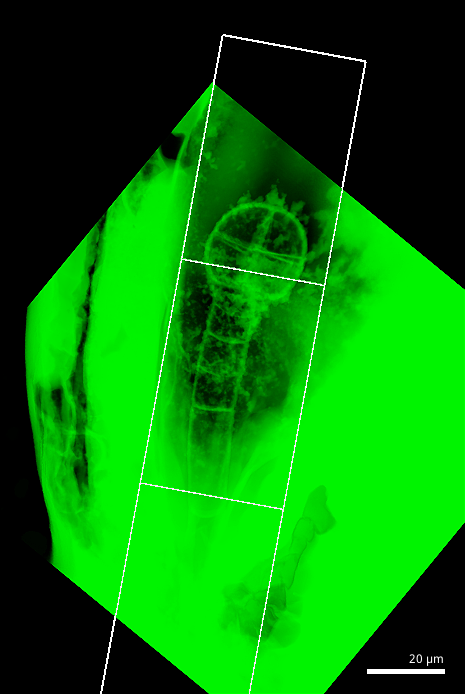
Figure 2: Place the clipping planes to include just the embryo itself.
Go to the View tab
Show the grid of the first clipping plane.
Make sure
Clip 1is selected in the Interaction box.Ajusting the thickness of the slice, and moving the clipping plane with the control-key pressed, place the clipping planes to include the embryo (see Figure 2)
Enable the clipping planes
Clip the image itself:
Process [Stack]Mesh Interaction/Clip Stack Adjust the transfer function of the work stack: click on the
 button of the work store and click on the auto-adjust
button. At last, adjust the opacity.
button of the work store and click on the auto-adjust
button. At last, adjust the opacity.Disable the
Clip 1from the View tab.
4.4.2.2. Using the Pixel Editing tool
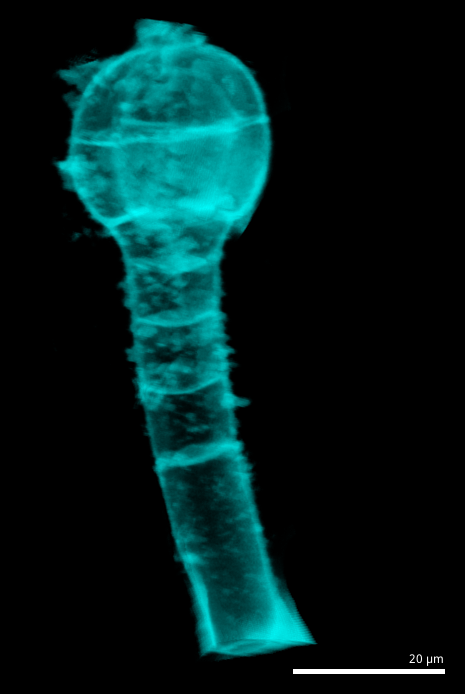
Figure 3: Cleaned stack
Select the pixel editing tool
Ensure the active stack is the
Work Stack 1In the View tab, make sure the
Fillcheck-box in the Stack Editing box is not checked.Remove pixels by pressing the Alt key and clicking. All visible pixels within the drawn circle will be erased! After a few minutes of erasing, you should get something like Figure 3.
When you are done, copy the result to the main store.
Process [Stack]Multi-stack/Copy Main to Work Stack
4.4.2.2.1. Troubleshooting
When using the pixel edit, depending on the view angle (e.g. the number of voxels that would need editing), the edition may be done only when you release the mouse button.
If you make a mistake, there is no undo! Unless you copy the stack back to the main store, where you will be able to access it again.
Process [Stack]Multi-stack/Copy Main to Work Stack Don’t panick if you find it hard to move around. This is normal at the beginning, but you will get used to it. A commonly forgotten useful shortcut allows to turn the object in the plane of view with Left+Middle mouse click (look at the Mouse and Keyboard help).
4.4.3. Segmentation
Now we have a nice, isolated image. We are ready for the segmentation part.
To make it easier and more reproducable, we need to scale the values to use the whole range. Run the process
Stack.Autoscale Stackfrom theFiltersfolder. If you changed the transfer function, you might need to re-adjust it.The image is too noisy to be segmented as is. You need to blur the image:
Process [Stack]Filters/Gaussian Blur Stack Parameter Value X Sigma (μm) 0.3 Y Sigma (μm) 0.3 Z Sigma (μm) 0.3 We will now segment the stack. The
Levelparameter is the most important one: it tells the algorithm the level of background noise to consider. Remember the values range from 0 to 65535, so 1500 is quite small. But if you didn’t autoscale the stack before, it may become very large compare to the actual maximum intensity!Process [Stack]ITK/Segmentation/ITK Watershed Auto Seeded Parameter Value Level 1500 Use the
Fill picked labeltool to erase the outside
cell: make sure no label is selected, and Alt-click on the outside cell to
delete it. There might be some other small cells to erase.
to erase the outside
cell: make sure no label is selected, and Alt-click on the outside cell to
delete it. There might be some other small cells to erase.
At that stage, the segmentation is mostly good, but some cells are too large. We could of course edit by hand the initial stack to improve, but we are going to use another means, more in line with what LithoGraphX is good with: interaction between mesh and stack.